My Zimbio
Top Stories

Friday, August 16, 2013

How to play MKV files on Nokia Lumia 1020?

MKV format is developed by Matroska. The Matroska Multimedia Container is an open standard free container format. It is created to store common multimedia content, like movies or tv shows.
This format, Matroska-mkv, is similar in concept to other containers like mp4, avi or asf, with implementations consisting mostly of open source software. Software support of mkv files include media players, like Zoom player, PotPlayer, MPlayer, VLC, GOM Player, Elmedia Player, Foobar2000 an Media center like Plex, PS3 Media Server and XBMC. FFmpeg, HandBrake, XMedia Recode, Format Factory and Pinnacle Studio also support Matroska. Many companies produce hardware that support Matroska container.


Nokia Lumia 1020 supported Video Formats

Video playback frame rate: 30.0 fps
Video playback codecs: VC-1, Windows video, H.264/AVC, H.263, MPEG-4
Video playback file formats: MP4, WMV, AVI, 3GP, 3G2, M4V, MOV
Video recording formats: MP4/H.264
Video white balance modes: Cloudy, Fluorescent, Incandescent, Automatic, Daylight

But many customers who have digital players like MP4, Windows Phone, etc. cannot use the MKV file as there gadgets do not support the format. So they need to convert mkv to other format like AVI so that these video users can share the audios and videos conveniently.


Step one: Download and install MKV to AVI Video Converter
Note: If you do not want to buy professional version, you can download free MKV to AVI Video Converter which is a completely free Software. You can enjoy your MKV in avi format by using this free MKV to avi video converter.

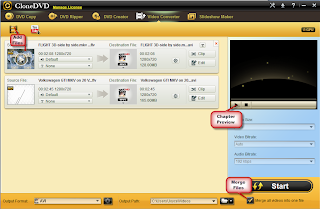
Step two: Add your MKV files to this mkv to avi converter
Simply click Add Video button to import the MKV video files from your hard drive. Batch video conversion and merging videos are supported. You can feel free to add MKV files as many as you wish and merge some or all of them into one AVI.


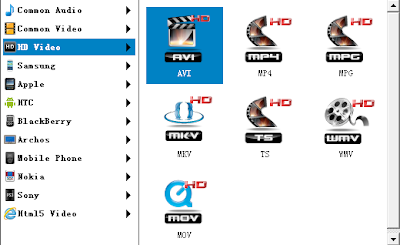
Step three: Choose avi as output video format
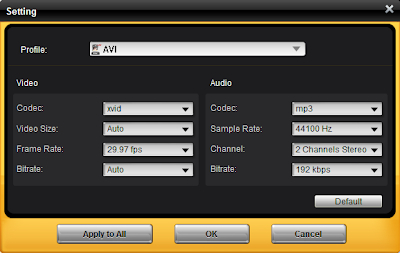
For better enjoying videos on your portable media devices, you can choose other output formats and customize video and audio options, such as Video Codec, Video Bitrate, Audio Codec, Audio Bitrate, Audio Channel, Disable Audio, etc.
If you need to customize your output video or audio files, click the Set icon on the right side of the file.


Step four: Start to convert
After everything is ok, you can click “Start” button to start conversion. Within a few seconds, you will observe that conversion process will begin. And when the converting shows 100%, it indicates the conversion completely.


Mac user also have its own version. MKV to AVI video converter for mac makes the conversion more easily when you get it in pc.

Wednesday, August 14, 2013

How to Rip DVD to AVI on Windows with CloneDVD DVD Ripper?

This is a guild of how to convert dvd to avi format with dvd ripper.
All-round DVD Ripper to Copy&Rip DVDs to Portable Devices Including iPad, iPhone, iPod, PSP, Nokia, Android, HTC, Archos, MP4 players, etc


Step 1 Download CloneDVD DVD to AVIconverter
You can download free trial version, then install and launch this program.

Step 2 import DVD video files
Click “+” button to load DVD, you can preview it in the small screen at the right of UI. More than one dvd you can add to the software.


Step 3 Select output format and path


Step 4 Start to convert
Click on the "Start" icon to begin ripping the files. You can see the ripping progress in real time.


That's all you need to do. This process is very straight forward and easy provided you have the right software.

Thursday, August 1, 2013

Seven Steps of Burning DVD


The exact steps that govern the DVD process will vary slightly due to the DVD burning software you select. The following steps have been simplified to be relevant for Mac and Windows users with almost any DVD software on the market today.

Step One – Choose Your Software
The first step in the DVD burning process involves choosing the software that you will use to create your media. There are many types of software available that can perform different tasks. Be sure to use a product that performs all of the functions you need and produces high-quality output.

Step Two –Insert a Blank Disc
The disc you insert into your drive can be a DVD-R or a DVD-RW. A DVD-R can only be used one time, but a DVD-RW can be reformatted and used again and again. If you choose to use a DVD-RW to burn important files or data, make sure that you ‘lock’ the DVD with your chosen software so that no one will accidentally record over it.

Step Three – Convert Files to Desired Format
Before you can burn your media to DVD, you will need to ensure that it is in the correct format. If you plan to put your DVD into a stand-alone DVD player, PS3 or any other piece of equipment, it must be in the correct video format. Some DVD burning software will automatically convert video files so that they can be played on this hardware, but you may have to find a separate piece of software if yours does not. FreeStudio is a good option that is available for free on the Web.

Step Four – Open the Software
After your blank disc has been inserted and the files you wish to burn have been converted to the correct format, it is time to open the DVD burning software. Do this by going to your programs list or by selecting the icon on your desktop. Your software may have several different programs included, so be sure to select the correct one.

Step Five – Choose Files to Burn
Once you have opened the software, you may be able to find a list of the videos or data you wish to burn within that software. Sometimes, however, it may be necessary for you to ‘drag and drop’ these items into a burn list. Either way, please follow the software manufacturer’s instructions regarding queuing the material you wish to burn.

Step Six – Click ‘Burn’ or ‘Start’ Button
After the files you wish to burn have been converted and listed in the queue, you can proceed to click the ‘Burn’ or ‘Start’ button in the software. The disc will be checked for errors or pre-recorded information, the files will be burned, and then the entire process will be finalized.

Step Seven – Retrieve and Store Removable Media
Most DVD burning programs have a built-in feature that will automatically eject your media once the burning process has completed, but you may have to turn this feature on through the settings menu. Place your newly burned DVD into a jewel case or sleeve to protect it from dust, spills and scratches.

Burning a DVD is a relatively simple process that even a beginner can understand. Please remember that these steps may vary slightly based upon your chosen hardware and DVD burning software.

Blog Directory